Post Book Stress Disorder

In sports there is a concept known as The Yips. It’s a condition that affects experienced athletes where they develop spasms in fine motor movements that impact their game in a profound way. It’s generally in culture ascribed to the athlete letting their head get in the way. They begin to overthink things too much. It interferes with their movements, causing them to do poorly. This creates a negative feedback loop where they are doing badly because they’re thinking too much, which causes them to think even more and do even more badly. It can completely destroy an athlete’s career.

Back when I started with tech, I didn’t have a lot of experience with programming, but I did have a lot of experience with writing and speaking. I delivered radio news for three years. I had a journalism degree. I knew that I could present and deliver information in a clear concise way. The big problem I had was that I was limited in what information I understood that I could present.

I had the opportunity to write several books early in my career that I felt very proud of. These were generally introductory books, which contain information that tends to be easier and more fun to present.

That changed two years ago when I was given the opportunity to write a book on Metal. I felt very strongly that I could learn and explain Metal in a way that was understandable because I was coming at this as a beginner. Everyone I spoke to who knew Metal was someone who was very familiar with OpenGL and didn’t really understand what a beginner would not know about. There was a lot of unfamiliar terminology that you need to have a good grasp of in order for Metal to be useful. I had a lot of confidence that I could present this information in a presentable way to people with no graphics background.

During the process of writing the book, I didn’t really have time to think about what I was actually trying to do. I was laser focused on accomplishing one task at a time until the book was done. It was an intense but satisfying experience to watch as my small steps added up to a full book.

I needed a break from writing, so I didn’t blog much or work on a book in 2018. During that year, I had some time to think. And the thoughts I had weren’t very pleasant.

When I completed the book I was proud of what I was able to accomplish in the time I had available. I felt that it would take two years to write a good book on Metal. I had about ten months. I didn’t have time/resources for the number of graphics I wanted for the book or the amount of sample code I originally planned for. When I finished I felt that I had had the minimal amount of time to write a book that I would not be embarrassed by. But not being embarrassed by something is vastly different from being proud of it.

There are several chapters of the book that my tech reviewers were deeply disappointed in. One of them has blocked me on Twitter. The other one will not speak to me. I don’t know if this is a reflection on them or on me. I don’t really understand socially what happened and it upsets me to know my peers do not like or respect me.

I have begun second guessing myself on the book. I don’t know if I presented the information well. I keep worrying that people who read the book are judging me and deciding the book was bad and that I exposed myself as a fraud who doesn’t know what I’m talking about.

I finally began reading through the book the Wenderlich’s published on Metal after having to get over my fears of it being far better book than my book was. I think it’s a better book than mine and they cover a lot of the material in a much more comprehensive manner than I cover my material, but I also feel the book is incredibly dense. I only understand the material presented because I took off nearly a year to fully understand Metal to the point of writing my own book. I don’t want that to come off as bitchy or dismissive of their book because it’s full of a lot of great information. It’s a great book for me and I am grateful that it exists, but I do wonder how much help it is to people without the same background I have.

I have begun to worry that this material is completely unpresentable. That there is no way to simply explain things to new users. This is causing me to second guess my ability to present any information about anything. I don’t know if I actually was ever good at presenting information or if it was just hubris on my part.

I am considering writing another book on a far less complex topic than Metal, but I am wondering if I have anything to contribute to that topic. I am wondering if I should bother writing anything because I don’t know if I can present information clearly in a way that people find useful. I also don’t know if anyone gives a crap about the things I want to talk about because it’s not about algorithms or cross platform JavaScript frameworks or network protocols. This is causing me a lot of depression and anxiety.

I don’t know if I should take this as a sign to give up on writing technical books or if I need to jump back in so that I can get over this. I keep going back and forth. Some days I am super enthused about the idea of writing a book from my own perspective. Other times I feel like I am just copying work other people have done but in a much less compelling way.

I feel the urge to hide. I don’t want to talk to or deal with anyone. I want to be left alone. I want to just work on crappy little projects that will never earn money that I do for myself because I have given up on the idea that I have anything of value to contribute to the tech community.

I keep trying to tell myself that completing the Metal book was an accomplishment. I wrote that book in less than a year. I wrote it by myself. I got up every day and stuck to a plan and shipped something. It’s not perfect. But for better or worse it’s presented in the way I felt it should be presented. This was a challenge and I don’t know if there is a right or wrong way to present difficult materials.

My hope is that anyone who reads the book and is disappointed by the content that they at least understand that I worked hard and did what I thought was right. I did the best I could under the circumstances that I was given. I don’t know if I would have done things any differently had I to go back and do it over again. But now I have to deal with wondering where I stand and what I have to contribute to the community.

Late Summer 2017 Conferences and Availability

A little over two weeks ago I finally was able to submit the final chapter for the rough draft of my book. I started the book back in October and it’s been a real trip. One thing I have not been able to do during the time I have been writing the book is have a stable full time job. Book writing is a full time job in and of itself, but it sadly doesn’t pay super well. One of my goals in the next few months is to line up a job so that I can start digging myself out of the hole I’m in.

I have two months to line something up. I am going to be speaking at a lot of conferences and doing a lot of traveling over the next two months. If you’re interested in seeing me, here are some of your options:

  • That Conference: That Conference is a spin off of Code Mash. It is a multi-platform conference that takes place at the Kalahari Resort in Wisconsin Dells. My talk on graphics programming will be on August 8th, which also happens to be the same day the final editing pass on all of my chapters is due. Busy times.
  • 360iDev: After missing the conference last year due to various work commitments, I am looking forward to coming back and seeing all my old indie friends. I will be doing a similar talk on graphics to the one I did at That Conference, but more tailored for iOS. That will be on August 16th in Denver, CO.
  • iOSDevUK: I get to take my second trip across the pond, both this year and in general, at the beginning of September. This conferences is in Aberystwyth, Wales and I will be presenting a two-hour pre-conference workshop on ARKit on Monday, September 4th.
  • Strangeloop: My final conference will be another multi-platform conference, but this time about cutting edge technology. I will be giving a talk on GPGPU programming on the iPhone using Metal and will try to talk a bit about CoreML. Strangeloop is in St. Louis, MO.

The book is set to release on December 4, 2017. I am working on the sample code that will accompany the book. My focus in writing the book was to provide more conceptual information about how Metal can be used rather than just cataloging the API. One of my frustrations in trying to learn OpenGL was the focus on the API with the assumption that everyone knows what a texture is and what Euler angles are. It is my intention that anyone buying the book use the sample code I am creating as canon since both Metal and Swift change so rapidly. I will maintain it and keep it up to date and I hope to add to it as new features become available.

I feel incredibly lucky to have had a chance to write this book. From the moment Metal was introduced in 2014 I felt like it was my thing. I worried I waited too long to get involved with it, but it seems like it’s been rather difficult for people to approach it due to the vast amounts of other concepts one must be familiar with before one can use Metal. I am hoping that this book helps open Metal up to other iOS developers.

I am planning my next steps right now. Beyond just finding a job and getting a paycheck, I have a few goals over the next few years that I would dearly love to fulfill. I will be sure to post more about them when they become more tangible. So far over the last ten years things have simply worked themselves out. I am hoping that this streak continues and that I know my next step when I see it. Until then, I am going to focus on the tasks ahead of me and do my best.

Goals for 2017

We’re about halfway through 2017. WWDC starts on Monday. I have been working on a book on Metal since about October. My life has been on hold since then as I knew I couldn’t really work a full time job and write a book on Metal at the same time. Metal is incredibly mentally comprehensive. It’s a multidisciplinary skill as you don’t just have to understand the framework, you have to have a large base of knowledge around linear algebra applications in order to have it do anything useful. Half of my book is about graphics and half is about machine vision/learning and GPGPU programming. So trying to learn all of these things and distill them into something that’s actually coherent to other people has been incredibly mentally exhausting. It’s been rewarding as well. I honestly don’t think I could do this while also working full time concurrently.

I am getting to the end of my time on the rough draft of the book and I need to figure out what I am going to do when it’s over. My plan was to try and knock this book out as quickly as possible and then hope I could use it as a portfolio piece to find a decent full time job that would hopefully allow me to work remotely. As I nearing the end of this process, I don’t really want to do that yet. Don’t get me wrong, if someone offered me a decent full time job that let me work from my house right now, I would accept it immediately. But right now that’s not what my main career goal is for the near future.

One of the wonderful things I got to do this year was attend GDC. I got to meet a lot of awesome game developers. As an iOS developer, I meet a lot of people who think game development would be cool, but it doesn’t pay anything, so they stick to learning Core Data and doing boring things that will keep them employed and pay the bills.

I don’t have an app out on the store. I have published multiple books (and yes, I do know how to code!) and have worked on many long term projects with a team of other people. But it bothers me that I have never published an app. Specifically, I want to publish a game.

I have been toying with game development for a few years. I have tried working through a few books on game development assuming that game programming would be exactly like iOS programming. It’s not. There are a lot of design patterns that are fundamentally different between iOS and game programming. Also within game programming, there are a lot of foundational differences between a platformer game and an RPG. Just knowing some foundational SpriteKit information is helpful, but it’s just the tip of the iceberg for creating something interesting.

I see game development as being similar to Metal in that just learning the framework isn’t enough. You have to have an idea about what you want to do with it in order for it to be truly useful. A lot of Apple’s frameworks are very Lego-block like in that you have a bunch of built-in methods to do whatever it is you want it to do. That can be satisfying to throw together, but it doesn’t give the same feeling of creation you get from doing something outside the box.

As of right now, I have two goals I would like to accomplish in 2017:

  1. Publish my Metal Book
  2. Publish a Game Made With SpriteKit

I know that my first goal will be accomplished. I don’t know about the second one. The second one depends upon me being able to line up enough part time contract work to pay my bills while also leaving enough time for me to dedicate to game development.

I am talking to several people who have created successful consulting companies about trying to figure out how to do this successfully. I have been consulting for the last year or so, but it’s been rather haphazard. I have been fortunate enough to know someone who needed a contractor at exactly the right time I needed to begin something else. I don’t want to continue to rely on getting lucky in order to sustain myself. I know if I want to do this long term I need to put time and energy into it.

So why am I writing this blog post?

I believe in manifest visualization. I have noticed that many people have amorphous goals that don’t really line up with what they actually want to accomplish. I went to school for audio engineering and a lot of people wanted to be rap stars. They didn’t want to be rap stars because they enjoyed making music, they wanted to be rich and famous. Being a rap star seemed like the easiest way to get rich and famous and they assumed that being rich and famous would make them happy. This lead to a lot of people being put into exploitive situations that did not make them rich, famous, or happy.

I believe having concrete goals you want to accomplish with no extraneous strings attached to them is the best way to approach accomplishing anything. My goal with the book was that I wanted to learn Metal and I wanted to have a book on Metal with my name on it out in the world. I have no illusions that it’s going to get me hired by Apple or propel me into a job where I make fuck you money. I don’t have any illusions about it out-earning my advance. If I never see another penny from it and it doesn’t change my career, I am still happy I did it because it’s something I wanted to do.

Right now my hope is that I can line up part time contract work (~ 20 hours a week) through the end of the year so that I can publish my game. I am hoping that by focusing on what I want to accomplish and having concrete ideas about how to do it that I will be able to reach my goal. I don’t think my game is going to earn any money and it will probably look very amateurish and get lots of one-star reviews, but I want to create it because it’s something I want to know I can do. I am praying that I can find a way to add value to someone’s company as a contractor that also allows me enough free time to pursue my own passions and interests.

I don’t know if I will be able to pull off what I want, but I at least have an idea about what that is. It does no good to get everything you ever wanted only to find out you wanted the wrong things.

The Metal Programming Guide Pre-Order

After many long months of work, “The Metal Programming Guide” is available for pre-order. Many people have been asking me questions and here are the answers to the most frequent ones:

  • The book is in Swift.
  • I don’t know if this will be available in an eBook format. I would be greatly surprised if it wasn’t. Every other book in the Red Book series has a Kindle or a PDF version available. If the book is available as an eBook, I believe it will be accessible.
  • I will be taking into account what happens at WWDC. As of today, the rough draft of the book is 75% complete. That translates to 15 chapters completed and five to go. I have a placeholder chapter for whatever new and shiny thing may be introduced at WWDC.
  • There is going to be sample code. I had some really tight writing deadlines and it was not possible for me to write the code concurrently with writing the book. I intend to spend the time between when the book is completed and when it’s released to ensure there is good informative sample code. I hope to continue to add to this sample code and maintain it as Swift and Metal evolve.
  • The overall composition of the book is about 50% graphics and 50% GPGPU programming. There are a few chapters in the graphics section that you will need to read if you’re only interested in GPGPU programming. Those are detailed at the beginning of that section.

One thing that I have learned while working on this book is that it’s impossible for this to be everything to all people. There are chapters in this book that have entire books dedicated to them. It wasn’t possible to write all of the implementation details of complex operations such as facial detection. My hope with the book is to basically prime the mental pump. I hope that if you encounter a topic you find interesting that I am giving you just enough information about it that you can somewhat wrap your head around it and seek out dedicated resources for it.

One of the biggest questions I have gotten over the last year is “Why should I know Metal?“ I am hoping that my conceptual chapters do a good job of answering that question for you.

I’m incredibly excited for this book. This is the book I have wanted to write since WWDC 2014. I thought that I waited too long and I missed out on being the person to write this book. I feel incredibly grateful for having the opportunity to take a year and really dive deeply into Metal. I knew since I started programming I wanted to learn and understand graphics. Getting to take that knowledge and apply it to thinks like data analysis and machine learning.

I loved math as a child. I felt like it was the language that helps us understand the Universe. I strayed away from it as a young adult because I had a bad experience with it and figured I was stupid and that it wasn’t for me. By bashing my head against vectors and matrices and seeing how you can use them to do amazing things has been a mental renaissance for me.

In life you don’t get a lot of opportunities to work on something you’re passionate about. I have been fortunate in my career to have several of these opportunities and I cherish every one of them.

Land of Misfit Frameworks

Right now I am in the process of writing a book on Metal. Metal came out the same year as Swift. One thing that has caused a lot of frustration among people like myself who are interested in Metal is the fact that there is not a lot of material out there on the framework. It’s gotten much better. Ray Wenderlich has released a video series on Metal. Apple dedicated a whopping five videos to Metal in 2016. If you’ve been checking the docs between when Metal came out and now, they have increased dramatically in both quantity and quality. Metal has come a long way over the last year.

There are frameworks that Apple released in the last few years that make Metal dramatically more useful. It integrates well with SceneKit, which makes it far easier to work with 3D graphics. In 2015, Apple introduced the Model I/O framework to make it easier to import 3D models from programs like Blender and Maya. Before that, you had to parse all these files by hand like a savage.

I had a sample project I wanted to do today that I didn’t realize I needed to import a model for. Most of the things that I need to do with Metal are made infinitely easier by Model I/O and SceneKit. But I don’t see people clamoring for more books on SceneKit or tutorials on Model I/O. There is almost no information out there about it outside of the Apple documentation. There is one piece of sample code and only one video from 2015.

I am not picking at Apple for not having more documentation. They have a lot on their plate and they’re doing the best they can. I am simply confused as to why I don’t see more people complaining about the lack of information about Model I/O. I don’t know if the lack of adoption of Model I/O is clamping the adoption of Metal or if it goes the other way.

I feel like there is a lack of understanding about what is out there and what the most optimal way is to get things done as efficiently as possible.

I know that SceneKit never got the amount of attention that it may have deserved. Everyone I talk to that would use SceneKit don’t want to because it’s not available on Android. I feel like most people I interact with use Unity because it was the best thing available five years ago and it’s just the thing they’re most comfortable with.

Apple has a lot of misfit frameworks. Gameplay Kit. Model I/O. SceneKit. These all work together and support one another. I want to see more stuff out in the world about these frameworks.

I am hoping that I can incorporate learning these frameworks into my exploration of Metal. I think that knowing these tools and using them in my projects will make my experience with Metal far richer and more productive than it would have been otherwise. I know this runs the risk of being a rabbit hole I fall down that prevents me from focusing and getting projects done. However, I think if I don’t raise my awareness of these frameworks, I will be missing the forrest for the trees. I will wind up wasting a bunch of time reinventing the wheel or creating useless things that don’t accomplish what they are capable of.

I am trying to remember that these are large topics. These take time to learn and adopt. Rome wasn’t built in a day. It’s important to remember this is a large topic and to not get frustrated when I realize things are large.

Special Announcement: The Metal Programming Guide

Hello all. For the last few weeks I have been hinting that I have a new project that I had not yet announced yet. I wanted to make this announcement at MacTech, which I did yesterday, so I am now publicly announcing this.

I am working on a new book: The Metal Programming Guide. If you are familiar with the OpenGL series of books like the OpenGL Red Book and the OpenGL Blue Book, this is going to be The Red Book for Metal. The publisher for this project will be Pearson/Addison Wesley, so this is not a self-publishing effort on my part. I will have technical editors and people breathing down my neck if I miss deadlines!

Back in 2014, when Metal was announced, it excited me tremendously. I did a series of conference talks on it throughout that year, but a little thing called Swift kind of got in the way of my learning path for Metal.

This year has been something of a disaster for me on a personal level and I didn’t get to accomplish what I had hoped to this year. Being given an opportunity to finally get to master Metal and write a book about it has given me hope for the future. I have always felt like Metal was something I was meant to do, but I wasn’t really ready to tackle it until now.

Right now I am trying to balance doing some short term contract work with attempting to work on the book. I hope to not run out of money before I finish the book, but I also want to avoid doing full time work that would prevent me from making progress on the book. We are very early in the process right now, but I am giving it everything I have to try and get this done in a reasonable amount of time.

I am hoping to be able to make weekly posts on here and my podcast about various aspects of Metal programming that I am not able to include in the book due to lack of time/space/things being out of scope.

Even though I have been a co-author on a number of programming books already, it has always been my dream to do an immersive book on a topic such as Metal. I am excited to learn this amazing framework and share that knowledge with everyone else.

I’m announcing it here on this blog because I have absolute confidence that this project will be successful. I’ve been waiting to do this for a long time. I do not plan to drop the ball on this. Bring it on!

Primitive Drawing and Assembly in Metal

One of the main reasons I got interested in iOS was because I wanted to learn graphics and audio programming.

I got really interested in OpenGL, but after a year of trying to learn it I wasn’t making any progress.

Anyone who has tried to learn OpenGL have gone through the same frustrating experience I have. You find a tutorial on Ray Wenderlich and you write a bunch of code and at the end you have a spinning multicolored cube. That’s really cool!!

But then you realize that you have absolutely no idea how to do anything else.

For a really long time, I thought that I had to enter all of my vertices by hand because every tutorial I saw had you write your vertices by hand. My brain was scrambled by the idea of trying to create a large, complex 3D model by hand coding the vertices. It’s hard enough coding things with auto complete, what if you miss a value?! Do you have to keep building it and keeping track of the vertices and try to figure out which one needs to be moved when there are a thousand of them?!

Eventually I was told that you import a pattern file into your application, but until the release of Model/IO in iOS 9, you had to write your own parser from scratch to import a file from Blender or Maya.

So I faced an incredible amount of frustration trying to figure out how you get vertices into an application and how they work together to create something. I kept being told that those projects of the spinning cube introduce you to all the things you need to know in order to make OpenGL work, but it was something that was not intuitive.

I am seeing people go through similar frustration while trying to learn Metal. I am hoping to do a series of blog posts over the next few months about aspects of Metal and 3D graphics programming that I don’t feel I have seen explained very well in other places. This stuff is complicated and difficult to explain, so no judgement on anyone who produces technical materials on Metal or OpenGL.

Star Project

I decided to do a project that was slightly more complicated than a triangle or a cube but not as complicated as a 3D pug model. I want to figure out how to explain this stuff in a way that the reader can extrapolate and scale the complexity while still understanding how the fundamental concepts work.

I decided to try and draw a two-dimensional star. It’s slightly more complicated than a triangle but it’s still simple enough for a person to sit down and conceptualize.

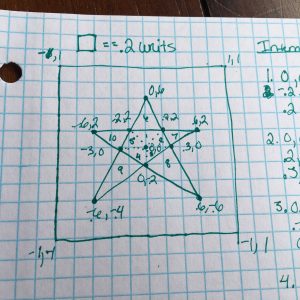
Yes, I screwed up the vertex labels at the bottom.

Yes, I screwed up the vertex labels at the bottom.

I really hoped that I could find a simple CAD program to generate a pattern file for my 2D star, but after multiple frustrating conversations with various people, I decided to bite the bullet and just plot out the vertices by hand.

The Metal rendering space is slightly different than what one expects coming from something like Core Graphics. I am used to the idea that the phone has a normalized coordinate space where the height is one unit and the width is one unit.

Metal still utilizes a normalize coordinate space, but it’s two units high and two units wide, so the center of the screen is coordinate (0,0,0). So the upper left corner of the screen is at coordinate (-1, 1, 0). The lower right corner is (1, -1, 0). It’s not complicated to understand, but it’s slightly counterintuitive for someone coming from the idea that everything is a value between 0 and 1.

I created my coordinate space using graph paper. I made each square on the paper worth 0.2 units and made the space ten squares by ten squares.

I understand that because the phone screen is not perfectly square that the star is not going to look like this when it’s finally rendered. One of the things I want to do later is figure out how to constrain the drawing area to be square so that the star renders properly, but that’s a task for a later time.

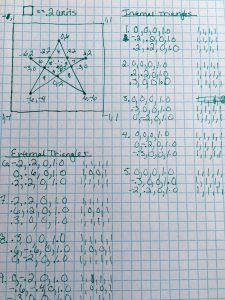
Writing out vertices by hand like a savage.

Writing out vertices by hand like a savage.

In Metal and OpenGL, shapes are composed of triangles. All the big scary 3D models that make up a Pixar movie are composed of meshes of triangles. Everything can be broken down into triangles.

So let’s think about a star. It’s obvious that the points are composed of triangles, but what about the middle? The middle is a pentagon. This pentagon can be composed of five triangles by drawing out from the center to each of the vertices between the points.

So if you think about how to describe the star to the renderer, you are going to describe ten triangles using eleven vertices. There are five vertices at the points, the five between the points, and finally one in the middle.

Metal Primitives

When you package and pass your vertices to the vertex buffer, you need to describe to the vertex buffer what type of shape it’s drawing. I know I just went off on how everything can be broken down into triangles, but there are a few flavors of shapes you can draw with Metal.

Metal has a enum of Metal Primitive Types. There are five different primitives available to you:

  • Point: Rasterizes a point at each vertex. You have to define a point size in the vertex shader.
  • Line: Rasterizes a line between a pair of vertices. These lines are separate and not connected If there are an odd number, then the last vertex is ignored
  • Line Strip: Rasterizes a line between a bunch of adjacent vertices, resulting in a connected line.
  • Triangle: For every separate set of three vertices, rasterize a triangle. If the number of vertices is not a multiple of three, either one or two vertices is ignored.
  • Triangle Strip: For every three adjacent vertices, rasterize a triangle.

So the easiest way to think about how to describe the star to the vertex shader is to hand enter ten sets of three vertices that describe a triangle.

let vertexData:[Float] =
    [
        // Internal Triangles
        0.0, 0.0, 0.0, 1.0,
        -0.2, 0.2, 0.0, 1.0,
        0.2, 0.2, 0.0, 1.0,
        
        0.0, 0.0, 0.0, 1.0,
        0.2, 0.2, 0.0, 1.0,
        0.3, 0.0, 0.0, 1.0,
        
        0.0, 0.0, 0.0, 1.0,
        0.3, 0.0, 0.0, 1.0,
        0.0, -0.2, 0.0, 1.0,
        
        0.0, 0.0, 0.0, 1.0,
        0.0, -0.2, 0.0, 1.0,
        -0.3, 0.0, 0.0, 1.0,
        
        0.0, 0.0, 0.0, 1.0,
        -0.3, 0.0, 0.0, 1.0,
        -0.2, 0.2, 0.0, 1.0,
        
        // External Triangles
        0.0, 0.6, 0.0, 1.0,
        -0.2, 0.2, 0.0, 1.0,
        0.2, 0.2, 0.0, 1.0,
        
        0.6, 0.2, 0.0, 1.0,
        0.2, 0.2, 0.0, 1.0,
        0.3, 0.0, 0.0, 1.0,
        
        0.6, -0.4, 0.0, 1.0,
        0.0, -0.2, 0.0, 1.0,
        0.3, 0.0, 0.0, 1.0,
        
        -0.6, -0.4, 0.0, 1.0,
        0.0, -0.2, 0.0, 1.0,
        -0.3, 0.0, 0.0, 1.0,
        
        -0.6, 0.2, 0.0, 1.0,
        -0.2, 0.2, 0.0, 1.0,
        -0.3, 0.0, 0.0, 1.0
]

I want my star to be kind of flashy. I would like to set a pseudo-radial gradient on the star where the tips are red, but the middle is white. So I need to set up another array of floats describing the color data as it correlates to the positional data.

let vertexColorData:[Float] =
    [
        // Internal Triangles
        1.0, 1.0, 1.0, 1.0,
        1.0, 1.0, 1.0, 1.0,
        1.0, 1.0, 1.0, 1.0,
        
        1.0, 1.0, 1.0, 1.0,
        1.0, 1.0, 1.0, 1.0,
        1.0, 1.0, 1.0, 1.0,
        
        1.0, 1.0, 1.0, 1.0,
        1.0, 1.0, 1.0, 1.0,
        1.0, 1.0, 1.0, 1.0,
        
        1.0, 1.0, 1.0, 1.0,
        1.0, 1.0, 1.0, 1.0,
        1.0, 1.0, 1.0, 1.0,
        
        1.0, 1.0, 1.0, 1.0,
        1.0, 1.0, 1.0, 1.0,
        1.0, 1.0, 1.0, 1.0,
        
        // External Triangles
        1.0, 0.0, 0.0, 1.0,
        1.0, 1.0, 1.0, 1.0,
        1.0, 1.0, 1.0, 1.0,
        
        1.0, 0.0, 0.0, 1.0,
        1.0, 1.0, 1.0, 1.0,
        1.0, 1.0, 1.0, 1.0,
        
        1.0, 0.0, 0.0, 1.0,
        1.0, 1.0, 1.0, 1.0,
        1.0, 1.0, 1.0, 1.0,
        
        1.0, 0.0, 0.0, 1.0,
        1.0, 1.0, 1.0, 1.0,
        1.0, 1.0, 1.0, 1.0,
        
        1.0, 0.0, 0.0, 1.0,
        1.0, 1.0, 1.0, 1.0,
        1.0, 1.0, 1.0, 1.0
]

Over in the view controller, you need to create a buffer to hold the position data and one for the color data for your vertices:

var vertexBuffer: MTLBuffer! = nil
var vertexColorBuffer: MTLBuffer! = nil

Now you need to connect those buffers to the arrays of vertex data. The buffers don’t know how much data they need to store, so you have to calculate how large these vertex arrays are so the buffers know how much space they need to allocate for the vertex data.

let dataSize = vertexData.count * MemoryLayout.size
vertexBuffer = device.makeBuffer(bytes: vertexData, length: dataSize, options: [])
vertexBuffer.label = "vertices"

vertexColorBuffer = device.makeBuffer(bytes: vertexColorData, length: dataSize, options: [])
vertexColorBuffer.label = "colors"

img_5660Since the vertex position and color arrays are the same size, you can reuse the data size variable for both buffers.

At the end of the process, this data is scheduled by the render encoder to be sent to the vertex shader and be processed by the GPU.

renderEncoder.setVertexBuffer(vertexBuffer, offset: 0, at: 0)
renderEncoder.setVertexBuffer(vertexColorBuffer, offset:0 , at: 1)
renderEncoder.drawPrimitives(type: .triangle,
                                   vertexStart: 0,
                                   vertexCount: vertexData.count)

Build and run the app on a phone and you get a nice star! Huzzah!

Wrap Up

I created a GitHub repo for this project here. Honestly, most of this project was basically me just using what comes in the template but changing the vertex data.

Looking this over, it seems kind of inefficient. The middle set of triangles feel like they could be a triangle strip. I would like to add a nice outline to the star to make it look nice and neat. I also would like the star to not be morphed by the screen.

I am planning to update this project periodically to make it more efficient and customizable.

At the very least, I hope this adds some understanding to how Metal breaks down larger shapes into triangles and how it’s able to go through and build the shapes back up again.

Streaming WWDC 2016

I have never had the privilege of attending WWDC. Most years (including this one) I never bothered to apply to the lottery because I couldn’t afford to go. The one year I could afford to go, I didn’t win a ticket and I decided I would rather have the money as a buffer than go out to WWDC. This was the correct decision.

I attend a lot of conferences. I speak at a lot of conferences. Unfortunately, I have had some difficulty actually attending sessions at conferences. I have panic attacks when I am trapped in a room full of people and I can’t get up and walk around. This was one reason I was never super disappointed about going to WWDC the last few years. The idea of being stuck in a room for a whole week makes me feel like curling in a ball and crying. I go to conferences to network and drink with my friends. Now I am at the point where it’s just networking since I gave up drinking.

One thing I had forgotten about was discovering new things by attending sessions I hadn’t thought to go to. When I went to my first CocoaConf, I encountered a lot of interesting things because I wanted to watch Jonathan Penn and Josh Smith present.

When Swift was introduced two years ago, most of the conference sessions revolved around talking about Swift. I like Swift, it’s a neat language, but I am sick of talking about it. I am tired of hearing people talk about side effects and protocols and immutable state. I miss the first few years I was an iOS developer when people talked about frameworks and weird little nooks and crannies of the Cocoa architecture.

Taken together, this has created something of a perfect storm where I got burned out on iOS development. I got sick of talking to people about it because it always boiled down to Swift and arguing about code purity and a bunch of other bullshit.

I saw the Keynote this year and I had absolutely no enthusiasm for anything this year. I was irritated and cranky and didn’t want to deal with anything. But I noticed that this year Apple decided to stream most of the sessions live. The sessions were always available online later and last year they started showing select sessions. I watched the Swift ones because it was for my job and was still new and exciting. But I rarely watch the sessions afterward because when I watch the sessions, I sit there and pause every few minutes to try and process the vast amount of information that is being presented. There is a massive backlog of lots of sessions I think would be nice to watch but I never get around to watching. I did not think I would do anything this year.

I was wrong.

Streaming the sessions live has completely changed my life this week.

I work from home and so I just kind of threw the live stream on while I worked on stuff. I have it on in the background. I can’t pause the live stream, so I am not poring over every second of each video minutely. I am getting an overview of what they are talking about so I can go and research things later. I also have a team of people on various Slack channels who are watching it with me that I can chat with about the things we find new and exciting.

There were five whole sessions on Metal this year. The last two years I only got through the first Metal video because I felt like I didn’t understand it well enough to move on to the next video. This year, since they were just on, I could passively leave it on and get through all the videos. If this was a normal year, I would not have encountered the thing that has excited me the most this year, which is doing neural networks in Metal. That was introduced in “What’s New in Metal Part 2,” which was the fourth Metal video streamed. I did not need all the context from the first three videos to get excited about the new stuff in Metal.

I got to watch all the videos about GameplayKit, Photos, SpriteKit, etc… All of these technologies that I have been interested in but in a passive way were all just there for me to listen in on. I got introduced to so many things I didn’t know about in obscure frameworks that don’t get a lot of love because most people need to pay the bills and so they don’t do sessions on SceneKit.

This is what it was like at the beginning when I started going to conferences. I would discover so many new things that I would go home excited to get working on something. I haven’t felt this way for the last two years.

I worked for Brad Larson for a year. He told me that the reason he got into making Molecules and got into OpenGL and doing GPUImage was because he had a free period at WWDC and just decided, on a whim, to watch a session on OpenGL. It’s crazy to me about how things you do on a whim or by chance can completely change your life. By not being exposed to these sessions over the last few years, I have been cutting myself off from these chance encounters to find something truly special that I can learn and make my own.

It has been a great gift to get to participate with WWDC from home. Being able to get up and walk around during a session and cuddle with Delia while listening to people give their talks has helped me tremendously. I can talk to people on Slack from all over the world about the sessions as they happen so we can all be excited together. I know that people get something out of being there and getting to talk to the engineers, but for someone with mental health issues that prevent them from being able to be comfortable with massively large amounts of people, this has been a godsend.

I am planning in the future to go back and watch all the videos from previous years that I never watched because they took too long. I can have them on in the background while I work on other things. I can pick out the parts that interest me and look into them further.

For the first time in a really long time, I am excited about iOS development. Thank you Apple for giving that back to me.

Getting Metal Up and Running: Metal Template

Note: The code from this tutorial is based on this tutorial from Ray Wenderlich. This was written in 2014 and was not updated for Swift 2.0, so there are a few changes I have made to my template to make it up to date. I am also writing my own explanations about what each part of this process does. If you just want something that works, you can download to template. If you want something easier to skim, I suggest looking through the Ray Wenderlich tutorial.

Metal was announced at WWDC 2014. It was the most exciting announcement of WWDC for approximately five minutes until Swift was announced.

I was doing a high level Swift talk in 2014 when I didn’t know the framework very well yet and I just wanted to give people an idea about why Metal was important. People were understandably unhappy that I didn’t show them how to code Metal. I am rectifying that mistake.

As was the case when Metal was first announced, you can’t test Metal code in the simulator. You have to build on a device with an A7 chip or later. The most primitive iOS device you can use for this is the iPhone 5S.

The goal of this project is to create a template that can be used as a base to just get Metal up and running. This doesn’t do anything other than render a color to the screen. I will take this template and add vertex buffers and geometry in a later post to explain how that process works. I didn’t include those in this project because I didn’t want to include anything that would need to be deleted by the programmer before it could be used.

Let’s get started!

Create Project and Import Frameworks

If you want to walk through the process of building the template rather than just downloading it from GitHub, you can follow along with the directions.

Open Xcode and create a Single View Application. You can name it anything you want. If you are using this as a basis for a project, go ahead and name it whatever it will eventually be. Choose Swift as the language. I made mine Universal, but if you know it will only be on an iPhone, go ahead and just choose iPhone.

There are a few frameworks that you will need to import before you can get Metal up and running.

Add these import statements at the top of your ViewController:

import Metal
import QuartzCore

Metal is obvious. You need to import the framework to do anything with Metal. The QuartzCore is a little less obvious. We’ll get to that soon.

Most of the work we are doing will be in the ViewController class. Unless otherwise specified (as in the Shader code), add all code to the ViewController.

MTLDevice

First thing you need to set up for a Metal project is the MTLDevice. The MTLDevice is the software representation of the GPU. I go over the properties of MTLDevice in a previous blog post. We don’t need access to everything that MTLDevice does for this simple template.

At the top of the ViewController class, add the following property:

// Properties
var device: MTLDevice! = nil

You will be seeing and using the device property a lot in this project. The MTLDevice is the manager of everything going on with your Metal code. You will be instantiating this (and all other properties) in the viewDidLoad() method.

There is only one safe way to initialize your device property:

device = MTLCreateSystemDefaultDevice()

At this point in time, every Metal-capable device only has one GPU. This function returns a reference to that GPU.

CAMetalLayer

Note: You might see an error at some point in this code block that says CAMetalLayer not found. This drove me crazy for a really long time. I downloaded Apple’s template that utilized MetalKit that does not have an instance of CAMetalLayer because it is implemented behind the scenes. I thought it was something that was phased out.

This is an ambiguous compiler error. At some point Xcode switched from saying the build device was a physical device to the simulator. Rather than saying the code won’t build on the simulator, it says the CAMetalLayer was not found.

If you ever get weird, ambiguous compiler errors while coding Metal that say something doesn’t exist, check the build target!

Remember back at the beginning of the blog post where I told you to import QuartzCore? You are importing that for one purpose: To get access to CAMetalLayer.

In iOS, everything you see on your screen is backed by a CALayer. Every view, every button, every cell is backed by a CALayer. CALayer is like the canvas you use to render things to the screen. If you want to know more about CALayer there are a few good tutorials on it here and here.

Since Metal is a different beast than a normal UIView, you need to create a special kind of CALayer: CAMetalLayer. This layer doesn’t live in the Metal framework, it lives in the QuartzCore framework, along with the special layer for rendering different flavors of OpenGL ES.

Create an CAMetalLayer property under your MTLDevice property:

var metalLayer: CAMetalLayer! = nil

Initializing the CAMetalLayer is a little more complicated than initializing the MTLDevice. There are four setable properties on the CAMetalLayer:

  • Device
  • Pixel Format
  • Framebuffer Only
  • Drawable Size

Device is self explanatory. It is simply the MTLDevice we created in our last step.

Pixel format is your chosen MTLPixelFormat. There are over a hundred items in the MTLPixelFormat struct, but there are only three options available on the CAMetalLayer: MTLPixelFormatBGRA8Unorm, MTLPixelFormatBGRA8Unorm_sRGB, and MTLPixelFormatRGBA16Float. The default pixel format is MTLPixelFormatBGRA8Unorm, so I am just going to leave it there unless I have some reason to change it.

Framebuffer only is an optimization option. There are two kinds of MTLResource types in Metal: MTLTexture and MTLBuffer. MTLTexture objects are less efficient because they need to be able to sample textures and do pixel read/write operations. If you don’t need those things you can make your code more efficient by telling the compiler this is something it never has to worry about.

Drawable size specifies how large your texture is. Since we are not currently using a texture, we don’t need to set this.

Add the following code to your viewDidLoad() method:

// Set the CAMetalLayer
metalLayer = CAMetalLayer()
metalLayer.device = device
metalLayer.pixelFormat = .BGRA8Unorm
metalLayer.framebufferOnly = true
metalLayer.frame = view.layer.frame
view.layer.addSublayer(metalLayer)

You’re initializing the metalLayer, then setting the properties on it that are relevant to this project. We’re leaving the pixel format to the default and since we don’t have any textures, we’re setting the optimization to true.

As with all layers, we’re setting the frame and adding it as a sublayer. Huzzah!

Command Queue

We will need an object that will organize the commands that we need to execute. In Metal, that object is the MTLCommandQueue. The MTLCommandQueue is our Space Weaver that keeps all of our command threads straight and running properly.

Add this property to the top of your View Controller class:

var commandQueue: MTLCommandQueue! = nil

This creates a command queue that is available to all of our methods within our View Controller. It will be used in a couple of different places and we want it to remain consistent and not go out of scope.

Up next, we need to set the command queue. Add this line of code into your viewDidLoad() function at the bottom:

// Set the Command Queue
commandQueue = device.newCommandQueue()

We’re almost done implementing all the code we need in our viewDidLoad() method. We just need to set up the functionality to actually draw to the screen. For that, we need a display link.

DisplayLink

We now have our CAMetal sublayer in place and we can draw to the screen. But how do we know when to trigger the screen to redraw?

It needs to redraw any time the screen refreshes. Since this is a common task in iOS, there is a built in class available to do this: CADisplayLink.

CADisplayLink exists to synch your drawing to the refresh rate of the display.

Add a new property to your ViewController class:

var timer: CADisplayLink! = nil

In order to set up your display link, you need to tell it what the target is and what code needs to be run every time the link is triggered. Since we are creating this for the view controller, the target is self. We just need the program to render, so I called this selector renderloop:

// Set the Timer
timer = CADisplayLink(target: self, selector: Selector("renderloop"))
timer.addToRunLoop(NSRunLoop.mainRunLoop(), forMode: NSDefaultRunLoopMode)

After you initialize the display link, you need to register it with a run loop. We are just registering it with the main run loop on the default mode to get access to coordinate the redrawing of the screen.

You have specified renderloop as your selector, but it hasn’t been created yet. Go ahead and do that now at the bottom of the class:

func render() {
  // TODO
}
 
func renderloop() {
  autoreleasepool {
    self.render()
  }
}

So, we didn’t just create the renderloop method, we created another one as well. The renderloop method just calls a render method encapsulated within an autoreleasepool. We’ll be setting up that render method next.

Render Pipeline

Rendering is the process where the program takes all of the information it has about the scene and compiles it together to determine the color of each pixel on the screen.

This is a rich and immersive topic that I would like to explore more fully in time, but for now I am trying to make sure I include the most basic information necessary to understand the code needed to do the minimum here.

If you would like a better explanation of what rendering is and how it works, there is a great explanation of it and the math involved in Pixar in a Box on Khan Academy.

Now that we have our display link in place, we would like to be able set up the code necessary to take a bunch of numbers and small shader programs and turn them into something cool we see on the screen.

To do that, we need to set up a rendering pipeline. A rendering pipeline takes all the inputs you have (vertices, shaders, optimizations, etc…) and coordinates them to make sure that each vertex and fragment is produced properly on the screen.

This will require us to put a number of pieces in place. I will go over each one and explain its role in the process.

Render Pass Descriptor

We are going to go into that empty render method and start to fill it out. The first thing we are going to create in that method is the render pass descriptor. The render pass descriptor is a collection of color, depth, and stencil information for your renderer. In this simple template we are not concerned with the depth or the stencil properties, so we are focusing on the color properties.

Begin filling out your render() method with the following code:

func render() {
    let renderPassDescriptor = MTLRenderPassDescriptor()
    let drawable = metalLayer.nextDrawable()
    renderPassDescriptor.colorAttachments[0].texture = drawable!.texture
    renderPassDescriptor.colorAttachments[0].loadAction = .Clear
    renderPassDescriptor.colorAttachments[0].clearColor = MTLClearColor(red: 1.0, green: 0.0, blue: 1.0, alpha: 1.0)

First off, you’re creating a MTLRenderPassDescriptor(). You will need to set up the attachments for the render pass descriptor a little later. First you need to set up a property that you will need to hook up to the render pass descriptor.

The render pass descriptor needs a source for it to render. That source is maintained by the instance of the CAMetalLayer. The CAMetalLayer has a method on it called nextDrawable(). Internally, CAMetalLayer maintains a cache of textures for displaying content. This method grabs the next one in the queue available for use.

Our render pass descriptor needs to know a few things about its color attachments: texture, load action, and clear color. Our texture is whichever texture is up next in the CAMetalLayer’s pool of drawable textures.

We have three options for our load action: Don’t Care, Load, and Clear. Don’t care allows the pixel to take on any value at the start of the rendering pass. Load maintains the previous texture. Clear specifies that a value is written to every pixel. We want to use clear here because we want to over write the color that exists currently.

Lastly, we’re setting a clear color. I have arbitrarily set it to a nice magenta color. When you finally pull the switch on this application, you’ll know this succeeds when your screen turns a lovely shade of pink.

Create the Command Buffer

Everything that we do deals with buffers. You need to send commands to a buffer in order to get them to be executed and to see something happen on your screen.

In order to send your commands to a buffer, you need to create one. Let’s do that now.

Add the following code to the bottom of your render() method:

// Create Command Buffer
let commandBuffer = commandQueue.commandBuffer()

The MTLCommandBuffer, like the MTLDevice, is a protocol. It can’t be subclassed and there is only one way to instantiate a buffer object. That is calling the commandBuffer() method on and instance of MTLCommandQueue.

Earlier in this code we made MTLCommandQueue object that was available to the entire View Controller. This is why. We needed to be able to access the same command queue instance we created when the view loaded.

Render Pipeline State

We’re going to briefly jump back to our viewDidLoad() method to add one last piece that we need to set up our rendering pipeline. We need to monitor the pipeline state.

Create a new property at the top of the class along with the others:

var metalPipeline: MTLRenderPipelineState! = nil

Our pipeline state exists to interface with our shaders. Don’t worry, we will get to those.

In order to access our shaders, we are going to need some code:

// Set the Rendering Pipeline
let defaultLibrary = device.newDefaultLibrary()
let fragmentProgram = defaultLibrary?.newFunctionWithName("basic_fragment")
let vertexProgram = defaultLibrary?.newFunctionWithName("basic_vertex")

let pipelineStateDescriptor = MTLRenderPipelineDescriptor()
pipelineStateDescriptor.vertexFunction = vertexProgram
pipelineStateDescriptor.fragmentFunction = fragmentProgram
pipelineStateDescriptor.colorAttachments[0].pixelFormat = .BGRA8Unorm
        
do {
    try metalPipeline = device.newRenderPipelineStateWithDescriptor(pipelineStateDescriptor)
} catch let error {
    print("Failed to create pipeline state, error (error)")
}

The first thing you will notice is that we are creating a default library.

In Metal, shaders are instances of MTLFunction objects. A Library is a collection of MTLFunction objects.

The purpose of your MTLRenderPipelineDescriptor is to look at your collection of shaders and tell the renderer which fragment and vertex shader your project is going to use.

We’re creating a new default library. After that, we are creating instances of MTLFunction objects by reaching into the default library and looking for them by name.

After we have our MTLFunction objects, we need to tell the pipeline state descriptor which vertex and fragment shaders we want to use.

Since creating a Metal Pipeline is a failable operation, we need to wrap it in a do-try-catch block.

At this point you might be wondering where those vertex and fragment shader functions came from. Good question, you’re about to generate them.

Metal Shaders

Note: I am creating both a vertex and a fragment shader even though this template has no vertex buffer. I am not sure if you need a vertex shader if there is nothing for it to shade, but it builds and this is something you would be adding later when you did have a vertex buffer. It might not be strictly necessary, but I am leaving it here anyway.

In GLSL, you need both a vertex and a fragment shader since they were two halves of the same program. If the Metal Shading Language follows the same paradigms as GLSL, then this is also the case and both a vertex and a fragment shader are necessary for every program you build.

This section is going to be disappointing. I haven’t had a chance to figure this out very well yet, so I apologize for the lack of detail about how I came up with these parts. This will be rectified later.

This is the one part of your code that is not going into the ViewController class. You get to create a new file now!

Create a new file and choose the “Metal File” template. Name it “Shaders.metal”.

The Metal Shading Language is based on C++. I am not as familiar with it as I would like, so sadly this section is going to be less in depth than I would like. I promise there will be many blog posts about this in the next few months.

You are going to create two different shaders: vertex and fragment. At this point you might be wondering how these get into your default library. The way the default library works is that it automatically includes any function that is included in a .Metal file. You could create hundreds of vertex and fragment shaders in various files and all of them would be accessible from the default library. I believe that you can create multiple libraries, but that is just one of the thinks I am going to explore more fully in the future.

This is the code for the vertex shader:

vertex float4 basic_vertex(const device packed_float3* vertex_array [[ buffer(0) ]], unsigned int vid [[ vertex_id ]]) {
    return float4(vertex_array[vid], 1.0);
}

This is the code for the fragment shader:

fragment half4 basic_fragment(){
    return half4(1.0);
}

This code comes directly from the Ray Wenderlich tutorial. I don’t know how it was generated. I don’t want to speculate about how this works because I don’t want to have something out there that I am completely wrong about, so just know this works and I will explain why in a later blog post.

Render Command Encoder

Now that we have a buffer, we need to add some commands to it.

We’ve been creating a bunch of different things that haven’t been applied anywhere yet. We’re ready to put those things to work.

Add this code to the bottom of the render() method:

// Create Render Command Encoder
let renderEncoder = commandBuffer.renderCommandEncoderWithDescriptor(renderPassDescriptor)
renderEncoder.setRenderPipelineState(metalPipeline)
renderEncoder.endEncoding()

The command encoder needs to know about the render pass and the pipeline state. We already created both of these things and went into some depth about what they do. We’re simply adding these specifications to the render encoder. After we add those to the encoder, we need to let the render encoder know we’re done by ending our encoding.

Commit the Command Buffer

Almost done! Just two more lines of code:

// Commit the Command Buffer
commandBuffer.presentDrawable(drawable!)
commandBuffer.commit()

We are taking that top drawable texture from the CAMetalLayer and queuing it up in the command buffer to be processed by the render pipeline. Finally, we are committing the command buffer.

Bring it all Together

I have placed this code in a GitHub repository.

There are a lot of aspects of this project that I am looking forward to exploring in more depth over the next few months.

The purpose of this blog post was to try and flesh out some of the code a little bit. Most of the blog posts I have seen involving this kind of template don’t really get into the nuts and bolts about what each of these things does and why you need them in your project.

It would not be useful to delve into the nitty gritty of everything in the framework. This post was long enough as it is!

I hope that this was a little more helpful if you’re like me and you wonder what things do and why you need them instead of just being satisfied with having something that works.

This post took over a month for me to write. It’s possible there are aspects of this post that are disjointed or that I forgot to include. I would appreciate being made aware of any issues by being contacted on Twitter. I would also appreciate knowing if there are any specific topics in Metal that people are interested in hearing about.

Thanks for bearing with me through this incredibly long post!
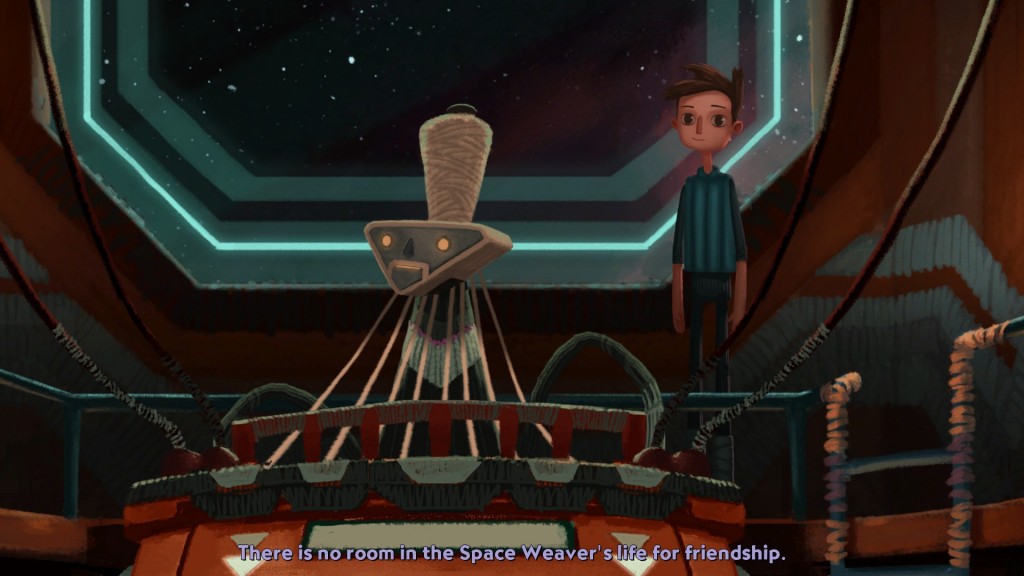
The Space Weaver is busy rendering fragments and vertices.
The Space Weaver is busy rendering fragments and vertices.
Getting Metal Up and Running: MTLDevice

I was really hoping last week to get a post out about creating a default Metal template, but I have been sick for a few weeks. Last weekend I sat in my chair staring at the TV because that was all I could deal with.

I am also recovering from a migraine that I have had for the past four days.

I was hoping to be able to go through my Metal template and remove all of the bells and whistles that were added by the Apple engineers to make the template do something and not just be a blank slate. I don’t feel comfortable enough to go through this and delete things yet, so I would like to talk about various Metal objects and components necessary to create a baseline Metal project and what purpose each of these serve.

I am posting this project on GitHub. I will be modifying it in the next few weeks to make this into a functional template anyone can grab if they want to start a Metal project but don’t want to deal with deleting boilerplate code. It’s not at that point yet, but hopefully before the end of the year!

The first, and most important, property I want to talk about is the MTLDevice. The documentation for MTLDevice is here.

Why Does Our Code Need an MTLDevice?

The MTLDevice is the software representation of the GPU. It is the way that you are able to interface with the hardware.

You might be wondering why this is something you would need. The iPhone is a cohesive unit that just kind of works when you program it. Why do you need to initialize a variable to represent part of your phone?

Whenever you create software that is going to interact with external hardware, you need to have a way to interface with it in your code.

When I was working at SonoPlot, we were writing control software for robots. We had classes for the robotics system and for the camera we were using.

The camera class had to have functions for every action we needed it to have. It also had a property for each thing that we needed to either get or set. One example is resolution. Some of our cameras had variable resolution and others were fixed. We had to have a property to either retrieve what that resolution was or that would set the resolution on the ones that can be set.

Even though we don’t necessarily think of the iPhone in terms of “external” hardware, it is. There are different parts of the iPhone that you can interface through the Cocoa frameworks. Speaking of cameras, the iPhone has a camera.

The AVCaptureDevice in AVFoundation is the interfacing class that Apple provides to allow you to talk to the camera. It fulfills the same function that our Camera and Robotics classes had in the robotics software.

Just as we needed to create a camera and robotics class to talk to our hardware, you also need to create an object that talks directly to your GPU.

One of the promises of the Metal framework is that you, as the developer, would have far more control over allocating and deploying resources in your code. This is reflected in the methods associated with the MTLDevice protocol.

Protocol, Not Object

The first thing to point out is that MTLDevice is not a class, it’s a protocol. At this point I am not entirely certain why it was designed this way.

The code to create the device is as follows:

let device: MTLDevice = MTLCreateSystemDefaultDevice()!

If you hold option and hover over the device variable, it indicates that it is a MTLDevice object. In order to be an object, it must be an instance of a class. My best guess is that this is an instance of NSObject that conforms to the MTLDevice protocol.

I am fascinated as to why this was implemented in this manner. I plan to look into this further, but this is one of those things that having an understanding of why it was done this way doesn’t necessarily help me get things done, so I am going to try and leave it alone for now.

Functionality

The functionality that the MTLDevice needs to be able to do for you are the following:

Identifying Properties

There are many more Apple devices and chip types that support Metal programming now than there were when it was initially announced. Back when it came out in iOS 8, we just had the iPhone 5S and one of the iPad models with an A7 chip.

Now, we have a lot of devices with a lot of different chip sets that all support Metal programming, including the Mac.

We’re in a similar situation with these chips that I was in with supporting the legacy robotics software at SonoPlot. We had three different types of cameras that all had different properties. You can’t assume that all the GPUs in each device are the same.

So, just as we did with the robotics software, there are several properties that are retrievable from the GPU.

The properties you can access on each GPU are:

  • Maximum number of threads per thread group
  • Device Name
  • Whether this GPU supports a specific feature set
  • Whether this GPU supports a specific texture sample count

Looking over this list of properties, it looks like as the chips have progressed, they have more and better capabilities. The A7 chip in my iPhone 5S is not as powerful as the A9X chip in my iPad Pro.

If you want to target less powerful devices, it might be useful to get familiar with the idiosyncrasies of the chips in these devices.

Creating Metal Shader Libraries

As a protege of Brad Larson, I am very interested in exploring shaders in Metal.

One of the big, stupid questions I have with Metal is how the shaders are set up. Every project I have seen (including the template) has had one shader file named “Shaders.metal.” Does that mean that all shaders go into one file? Are these just projects that use one shader? Is this basically set up the same way that OpenGL ES 2.0 is set up?

This says that all of the “.metal” files are compiled into a single default library, so that tells me that I can have more than one shader file in a project.

I am looking forward to exploring the shader libraries in the future, but right now just making a note that this is a responsibility of the MTLDevice.

Creating Command Queues

This is interesting to see that Metal has built in command queues.

I know that Brad utilizes Grand Central Dispatch in GPUImage to make it work as efficiently as possible. OpenGL ES doesn’t have a built-in command queue structure to the best of my knowledge. I know that OpenGL ES can only exist on one thread at any given time and that one of the promises of Metal was multithreading. If you’re going to multithread something you need some way of keeping your threads straight.

Looking forward to exploring the Metal Command Queues further.

Creating Resources

The resources you are creating with the Metal device are buffers, textures, and sampler states.

Buffers should be familiar to anyone who works with graphics or audio. To the best of my memory, in OpenGL ES you have three buffers: One for the frame that is currently being displayed, one for the next frame to be displayed, and one in the wings waiting to be deployed when the top buffer gets popped off the stack.

Textures are also a familiar concept. In GPUImage the photo or video you are filtering is your texture, so this is fairly straightforward.

I have never heard of a sampler state, so I am interested to find out what this does.

Not a lot new or exciting here if you have any familiarity with OpenGL ES.

Creating Command Objects to Render Graphics

This is where you set up your pipeline to render your graphics. In OpenGL ES 1.0 this was a fixed function pipeline without shaders. In OpenGL ES 2.0, the programmable pipeline was introduced along with the ability to use shaders. Shaders gave the ability to really generate shadows and ambient occlusion in graphics on an iOS device. Since we’re not taking a step backwards, there are commands here to set up your programmable pipeline.

Creating Command Objects to Perform Computational Tasks

One of the things that really excited me about Metal was the ability to do general purpose GPU programming (GPGPU) in iOS. I had hoped in iOS 8 to hear that OpenCL would be made available on iOS, so I was rather pleased to hear that this functionality was made available.

Jeff Biggus has been speaking about OpenCL for a few years and using the GPU for something other than just graphics processing. It is one of those things on my giant list of things I am interested in but haven’t had a chance to explore yet. This excites me and I am looking forward to writing a Metal project that utilizes this extra functionality.

Thoughts

I am really excited about all of the functionality I see exposed to me in this protocol.

I know I basically just went through the documentation and didn’t necessarily tell you anything you couldn’t look up on your own, but I do think it helps to have some context about WHY this stuff is in here, not just that it exists.

I will be getting into the command queues and buffers in more depth in my next post because those are absolutely necessary for a minimum viable application. It’s helpful to know that these things are created and controlled by this master object.

I hope that this was interesting and useful. I know in most of the documentation I am reading it just mentions you need to create a MTLDevice without exploring what it’s role is in the application. It’s a really vital part of the application and I hope that you have a better understanding and appreciation of what it does within a Metal program.