One of the main reasons I got interested in iOS was because I wanted to learn graphics and audio programming.
I got really interested in OpenGL, but after a year of trying to learn it I wasn’t making any progress.
Anyone who has tried to learn OpenGL have gone through the same frustrating experience I have. You find a tutorial on Ray Wenderlich and you write a bunch of code and at the end you have a spinning multicolored cube. That’s really cool!!
But then you realize that you have absolutely no idea how to do anything else.
For a really long time, I thought that I had to enter all of my vertices by hand because every tutorial I saw had you write your vertices by hand. My brain was scrambled by the idea of trying to create a large, complex 3D model by hand coding the vertices. It’s hard enough coding things with auto complete, what if you miss a value?! Do you have to keep building it and keeping track of the vertices and try to figure out which one needs to be moved when there are a thousand of them?!
Eventually I was told that you import a pattern file into your application, but until the release of Model/IO in iOS 9, you had to write your own parser from scratch to import a file from Blender or Maya.
So I faced an incredible amount of frustration trying to figure out how you get vertices into an application and how they work together to create something. I kept being told that those projects of the spinning cube introduce you to all the things you need to know in order to make OpenGL work, but it was something that was not intuitive.
I am seeing people go through similar frustration while trying to learn Metal. I am hoping to do a series of blog posts over the next few months about aspects of Metal and 3D graphics programming that I don’t feel I have seen explained very well in other places. This stuff is complicated and difficult to explain, so no judgement on anyone who produces technical materials on Metal or OpenGL.
Star Project
I decided to do a project that was slightly more complicated than a triangle or a cube but not as complicated as a 3D pug model. I want to figure out how to explain this stuff in a way that the reader can extrapolate and scale the complexity while still understanding how the fundamental concepts work.
I decided to try and draw a two-dimensional star. It’s slightly more complicated than a triangle but it’s still simple enough for a person to sit down and conceptualize.
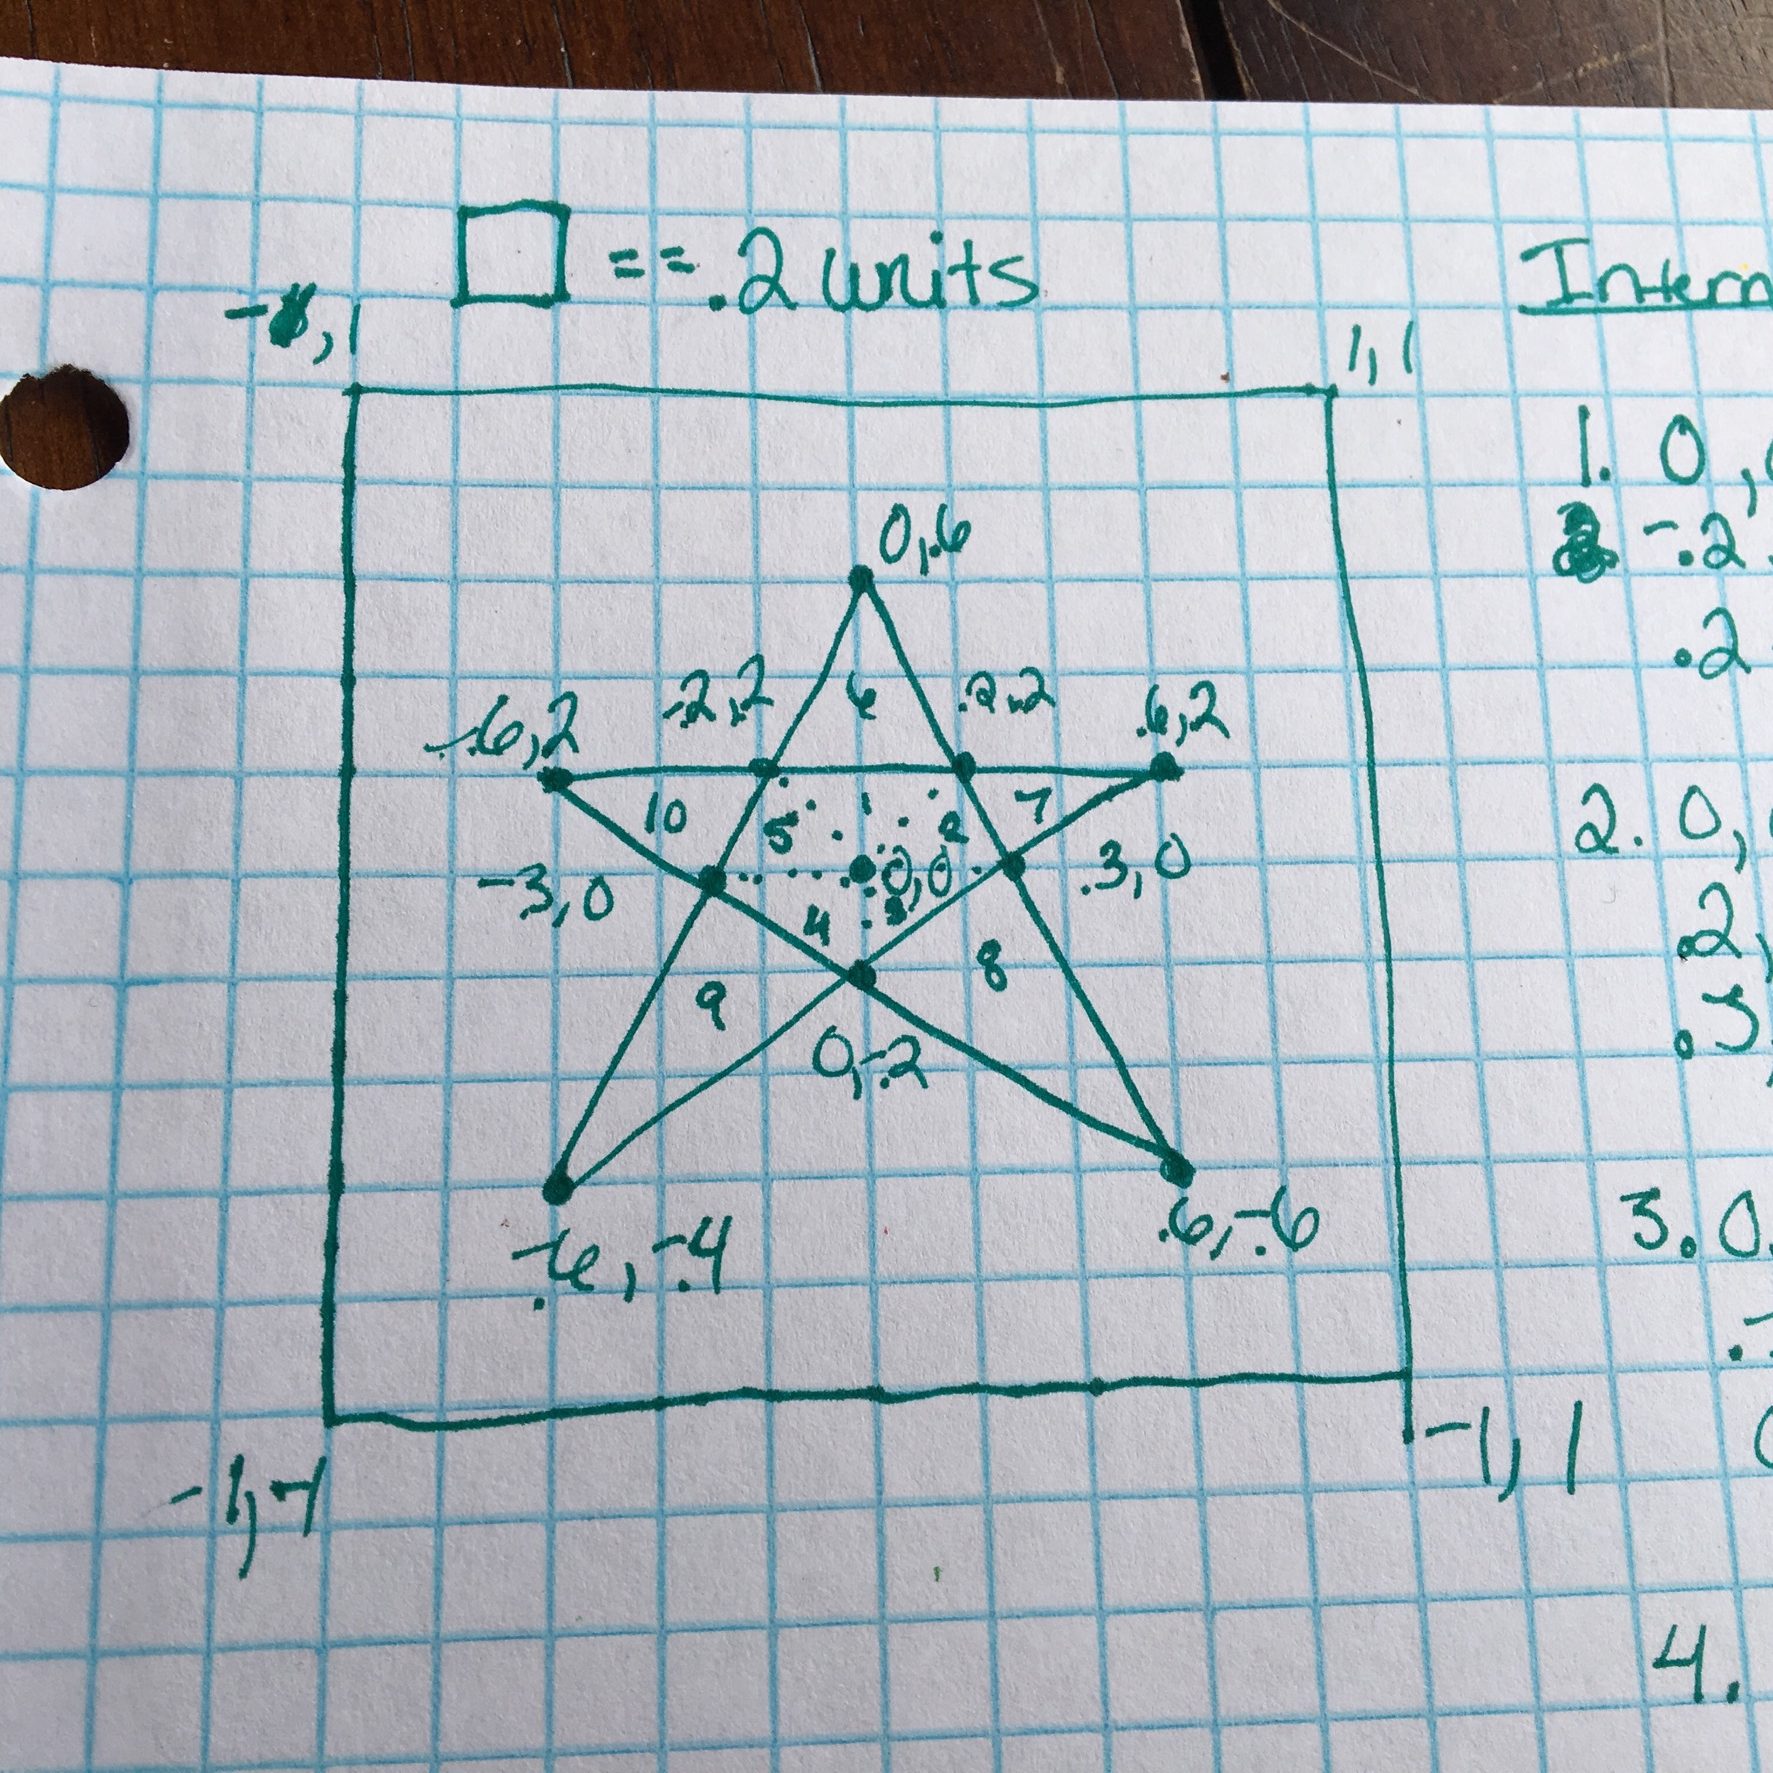
Yes, I screwed up the vertex labels at the bottom.
I really hoped that I could find a simple CAD program to generate a pattern file for my 2D star, but after multiple frustrating conversations with various people, I decided to bite the bullet and just plot out the vertices by hand.
The Metal rendering space is slightly different than what one expects coming from something like Core Graphics. I am used to the idea that the phone has a normalized coordinate space where the height is one unit and the width is one unit.
Metal still utilizes a normalize coordinate space, but it’s two units high and two units wide, so the center of the screen is coordinate (0,0,0). So the upper left corner of the screen is at coordinate (-1, 1, 0). The lower right corner is (1, -1, 0). It’s not complicated to understand, but it’s slightly counterintuitive for someone coming from the idea that everything is a value between 0 and 1.
I created my coordinate space using graph paper. I made each square on the paper worth 0.2 units and made the space ten squares by ten squares.
I understand that because the phone screen is not perfectly square that the star is not going to look like this when it’s finally rendered. One of the things I want to do later is figure out how to constrain the drawing area to be square so that the star renders properly, but that’s a task for a later time.
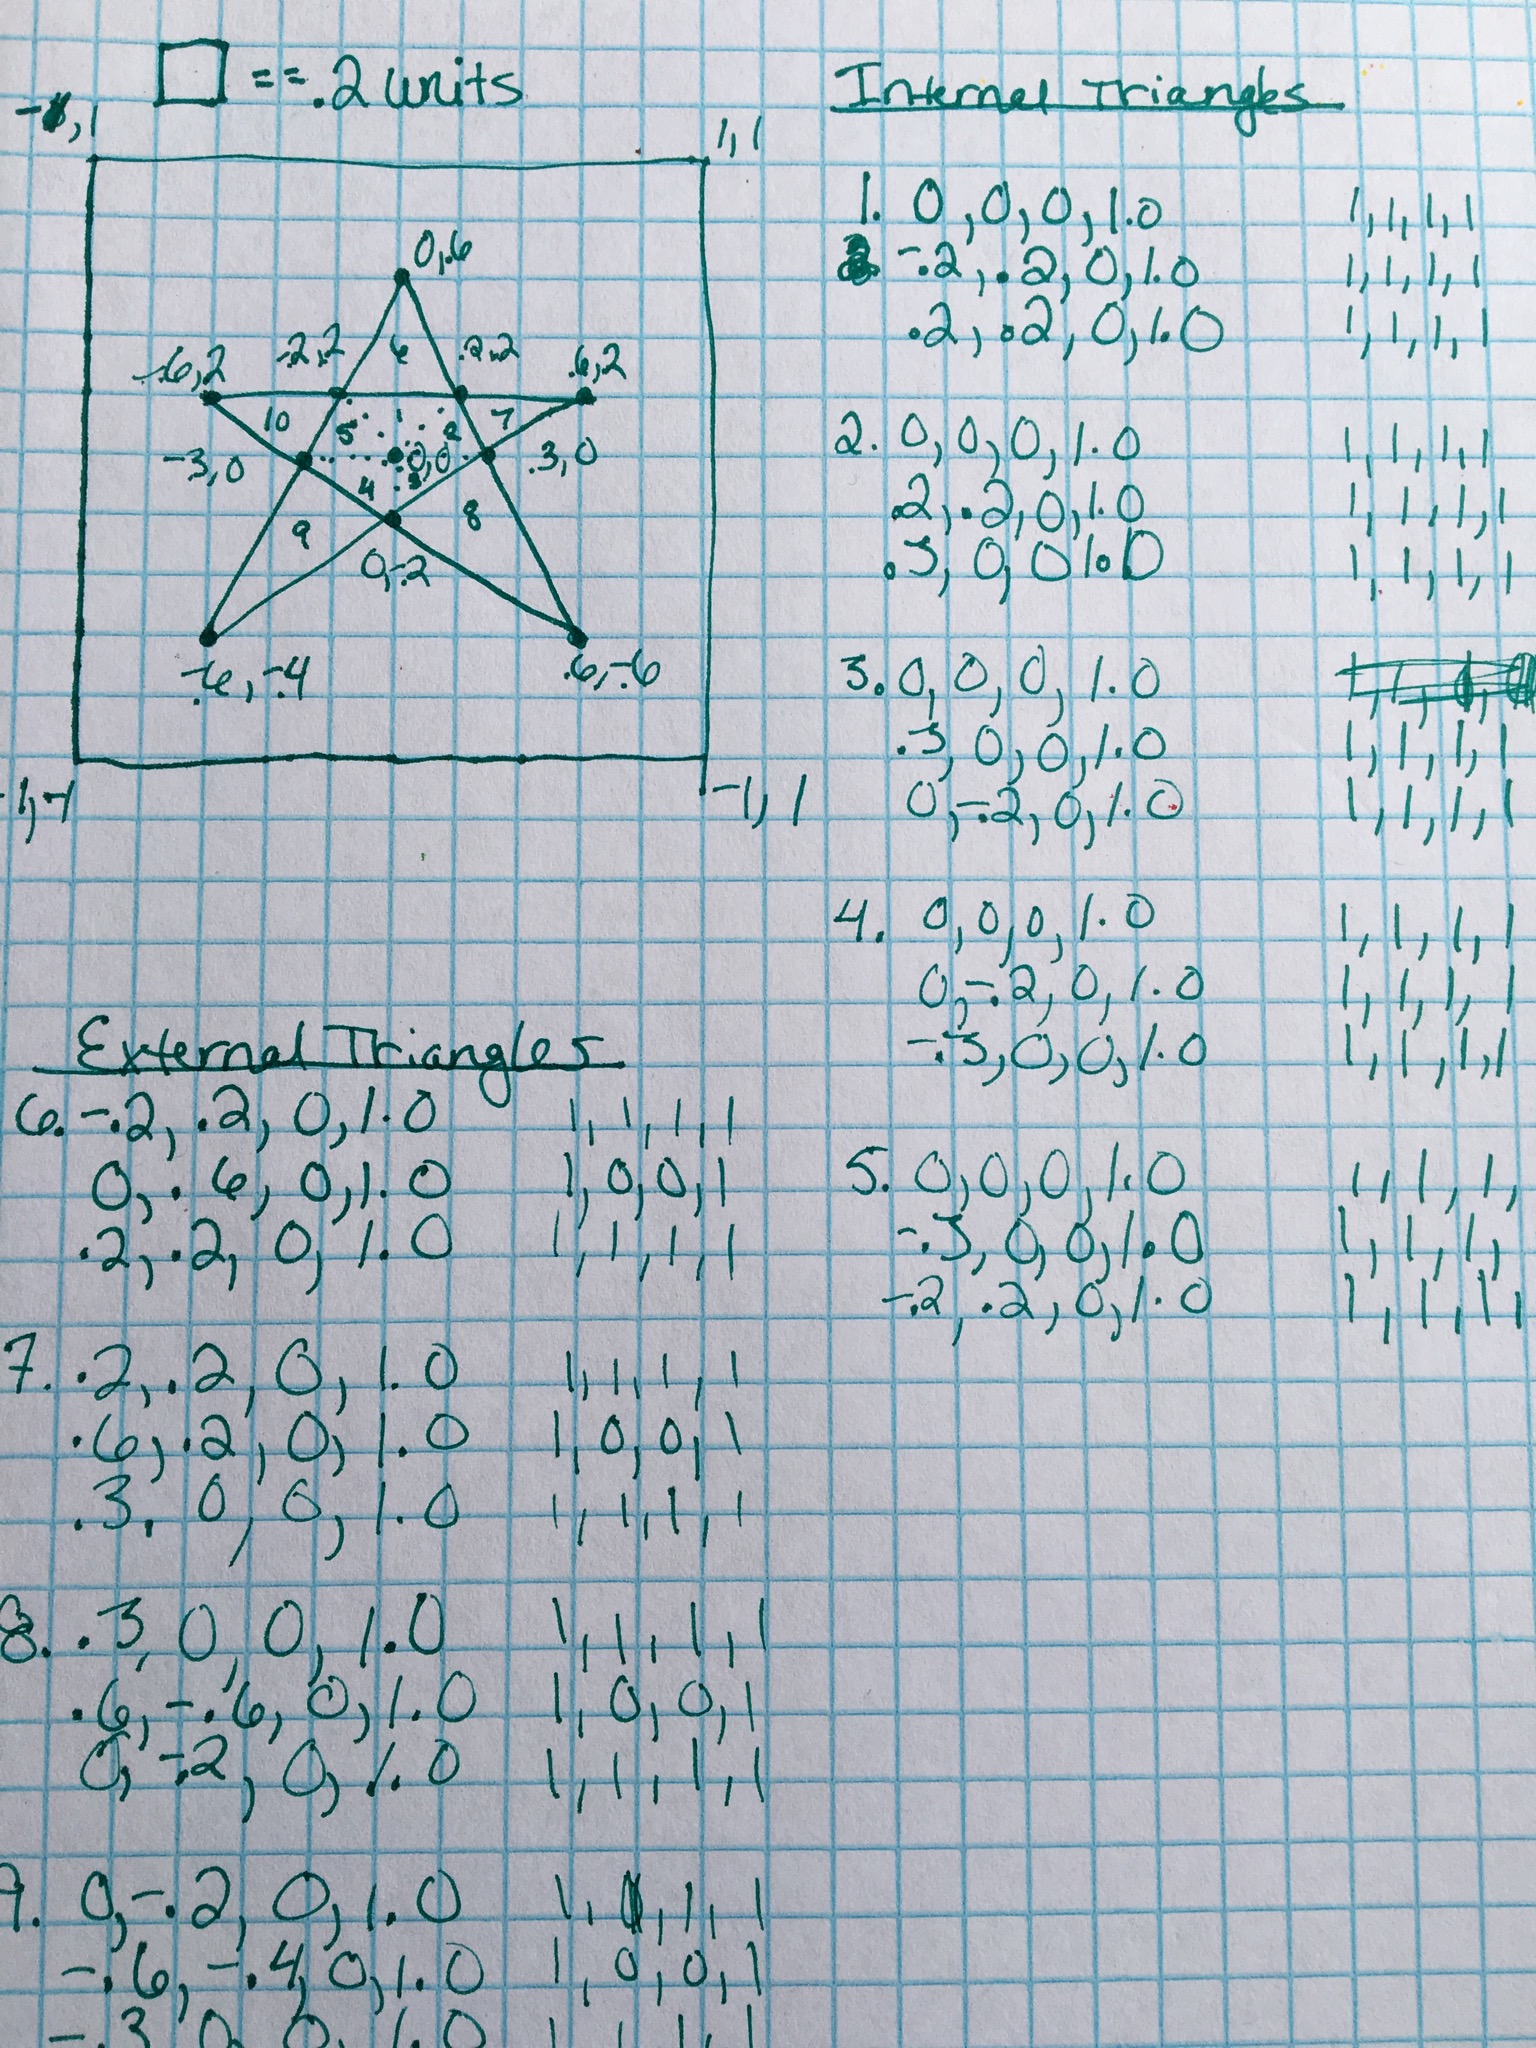
Writing out vertices by hand like a savage.
In Metal and OpenGL, shapes are composed of triangles. All the big scary 3D models that make up a Pixar movie are composed of meshes of triangles. Everything can be broken down into triangles.
So let’s think about a star. It’s obvious that the points are composed of triangles, but what about the middle? The middle is a pentagon. This pentagon can be composed of five triangles by drawing out from the center to each of the vertices between the points.
So if you think about how to describe the star to the renderer, you are going to describe ten triangles using eleven vertices. There are five vertices at the points, the five between the points, and finally one in the middle.
Metal Primitives
When you package and pass your vertices to the vertex buffer, you need to describe to the vertex buffer what type of shape it’s drawing. I know I just went off on how everything can be broken down into triangles, but there are a few flavors of shapes you can draw with Metal.
Metal has a enum of Metal Primitive Types. There are five different primitives available to you:
- Point: Rasterizes a point at each vertex. You have to define a point size in the vertex shader.
- Line: Rasterizes a line between a pair of vertices. These lines are separate and not connected If there are an odd number, then the last vertex is ignored
- Line Strip: Rasterizes a line between a bunch of adjacent vertices, resulting in a connected line.
- Triangle: For every separate set of three vertices, rasterize a triangle. If the number of vertices is not a multiple of three, either one or two vertices is ignored.
- Triangle Strip: For every three adjacent vertices, rasterize a triangle.
So the easiest way to think about how to describe the star to the vertex shader is to hand enter ten sets of three vertices that describe a triangle.
let vertexData:[Float] =
    [
        // Internal Triangles
        0.0, 0.0, 0.0, 1.0,
        -0.2, 0.2, 0.0, 1.0,
        0.2, 0.2, 0.0, 1.0,

        0.0, 0.0, 0.0, 1.0,
        0.2, 0.2, 0.0, 1.0,
        0.3, 0.0, 0.0, 1.0,

        0.0, 0.0, 0.0, 1.0,
        0.3, 0.0, 0.0, 1.0,
        0.0, -0.2, 0.0, 1.0,

        0.0, 0.0, 0.0, 1.0,
        0.0, -0.2, 0.0, 1.0,
        -0.3, 0.0, 0.0, 1.0,

        0.0, 0.0, 0.0, 1.0,
        -0.3, 0.0, 0.0, 1.0,
        -0.2, 0.2, 0.0, 1.0,

        // External Triangles
        0.0, 0.6, 0.0, 1.0,
        -0.2, 0.2, 0.0, 1.0,
        0.2, 0.2, 0.0, 1.0,

        0.6, 0.2, 0.0, 1.0,
        0.2, 0.2, 0.0, 1.0,
        0.3, 0.0, 0.0, 1.0,

        0.6, -0.4, 0.0, 1.0,
        0.0, -0.2, 0.0, 1.0,
        0.3, 0.0, 0.0, 1.0,

        -0.6, -0.4, 0.0, 1.0,
        0.0, -0.2, 0.0, 1.0,
        -0.3, 0.0, 0.0, 1.0,

        -0.6, 0.2, 0.0, 1.0,
        -0.2, 0.2, 0.0, 1.0,
        -0.3, 0.0, 0.0, 1.0
]
I want my star to be kind of flashy. I would like to set a pseudo-radial gradient on the star where the tips are red, but the middle is white. So I need to set up another array of floats describing the color data as it correlates to the positional data.
let vertexColorData:[Float] =
    [
        // Internal Triangles
        1.0, 1.0, 1.0, 1.0,
        1.0, 1.0, 1.0, 1.0,
        1.0, 1.0, 1.0, 1.0,

        1.0, 1.0, 1.0, 1.0,
        1.0, 1.0, 1.0, 1.0,
        1.0, 1.0, 1.0, 1.0,

        1.0, 1.0, 1.0, 1.0,
        1.0, 1.0, 1.0, 1.0,
        1.0, 1.0, 1.0, 1.0,

        1.0, 1.0, 1.0, 1.0,
        1.0, 1.0, 1.0, 1.0,
        1.0, 1.0, 1.0, 1.0,

        1.0, 1.0, 1.0, 1.0,
        1.0, 1.0, 1.0, 1.0,
        1.0, 1.0, 1.0, 1.0,

        // External Triangles
        1.0, 0.0, 0.0, 1.0,
        1.0, 1.0, 1.0, 1.0,
        1.0, 1.0, 1.0, 1.0,

        1.0, 0.0, 0.0, 1.0,
        1.0, 1.0, 1.0, 1.0,
        1.0, 1.0, 1.0, 1.0,

        1.0, 0.0, 0.0, 1.0,
        1.0, 1.0, 1.0, 1.0,
        1.0, 1.0, 1.0, 1.0,

        1.0, 0.0, 0.0, 1.0,
        1.0, 1.0, 1.0, 1.0,
        1.0, 1.0, 1.0, 1.0,

        1.0, 0.0, 0.0, 1.0,
        1.0, 1.0, 1.0, 1.0,
        1.0, 1.0, 1.0, 1.0
]
Over in the view controller, you need to create a buffer to hold the position data and one for the color data for your vertices:
var vertexBuffer: MTLBuffer! = nil
var vertexColorBuffer: MTLBuffer! = nil
Now you need to connect those buffers to the arrays of vertex data. The buffers don’t know how much data they need to store, so you have to calculate how large these vertex arrays are so the buffers know how much space they need to allocate for the vertex data.
let dataSize = vertexData.count * MemoryLayout.size
vertexBuffer = device.makeBuffer(bytes: vertexData, length: dataSize, options: [])
vertexBuffer.label = "vertices"

vertexColorBuffer = device.makeBuffer(bytes: vertexColorData, length: dataSize, options: [])
vertexColorBuffer.label = "colors"
 Since the vertex position and color arrays are the same size, you can reuse the data size variable for both buffers.
At the end of the process, this data is scheduled by the render encoder to be sent to the vertex shader and be processed by the GPU.
renderEncoder.setVertexBuffer(vertexBuffer, offset: 0, at: 0)
renderEncoder.setVertexBuffer(vertexColorBuffer, offset:0 , at: 1)
renderEncoder.drawPrimitives(type: .triangle,
                                   vertexStart: 0,
                                   vertexCount: vertexData.count)
Build and run the app on a phone and you get a nice star! Huzzah!
Wrap Up
I created a GitHub repo for this project here. Honestly, most of this project was basically me just using what comes in the template but changing the vertex data.
Looking this over, it seems kind of inefficient. The middle set of triangles feel like they could be a triangle strip. I would like to add a nice outline to the star to make it look nice and neat. I also would like the star to not be morphed by the screen.
I am planning to update this project periodically to make it more efficient and customizable.
At the very least, I hope this adds some understanding to how Metal breaks down larger shapes into triangles and how it’s able to go through and build the shapes back up again.